Tuesday, September 23, 2008

Ride Around the Bear


Joel Cinnamon's invitation to me to join his annual Beach-to-Baldy ride-and-hike Oct. 5 prompted me to post something about the Ride Around the Bear, which we rode together June 7.

The Ride Around the Bear leaves from Sylvan Park in Redlands and heads to Big Bear Lake via Hwy. 330 through Running Springs, then on to Big Bear Lake's north shore (Fawnskin), returning via Hwy. 38 over Onyx Summit, Barton Flats, Angeles Oaks and Mentone. The route covers more than 100 miles and 10,000' of climbing. Yeow!

The weather on June 7 was perfect, as was the ride -- and the company. (Well, except for the thousand-or-so very-loud Harley Davidsons that passed us on their way to a rally in Fawnskin). Below is a map and link to the GPS data for the day. Click on the image to go my MotionBased digest. (Mac users should click on the Player tab in the upper right to view the cool animation.)

Map of Ride Around the Bear

Here is a photo of Joel from Onyx Summit, which was at the end of most (repeat, most -- not all) of the climbing for the day. At 8,443', it's the highest paved road in Southern California. We did it, Joel! Next year, I predict new P.R.s.

Monday, September 15, 2008

Family Additions

Meet the soon-to-be-additions to the Davidson household:


When the stray orange tabby cat our next-door neighbor Susie named Lemonade (below) began alternating between her back yard and ours, we asked, "Whose is it?" No one in the neighborhood claimed her and she was clearly expecting a litter, so we began to wonder which of our houses would become the maternity ward. Three weeks ago, the planter outside Susie's back door became home to momma and her five kits.


We've claimed the two pictured below. We haven't named them and don't know their gender yet, but if they're both male, I think we should call them Chris and Dean.


The others are going to homes of friends of Susie's. Her boyfriend Albert might be taking Lemonade to his home in Orange County, but we're hoping she'll continue to share quarters with our house and Susie's and remain close to her kits.

Mount Everest Challenge

Because I won't be able to compete in next week's Mount Everest Challenge State Climbing Championships bike race, I decided to create my own personal version this past weekend. The Everest Challenge, which I completed in 2004 and 2005, is a two-day, 206-mile sufferfest that sends you up and down six mountains in the Sierras for a total of 29,035' of elevation gain.

While the 201 miles I rode over the weekend came up short by Everest Challenge standards, I outdid the elevation gain substantially -- 32,525'. Yesterday's ride was epic: 122 miles and 18,268' of climbing. What else are you going to do on a glorious near-end-of-summer weekend? Get outdoors and savor it!

Below are the MotionBased Player views of the rides (click on images to view full size). I can't wait to get away from this desk and get up there again!


High Performance, Low Profile

Check this out: Some of Dean's most recent work for Dri-Eaz is on the web. While his work is primarily for print, he works in the same office with Dri-Eaz web dude (er...administrator) Marcus Purnell, who converted a recent piece Dean designed into a web page (click on images to view full size):


Note the source code (highlighted in yellow), where Marcus gave him credit. Very cool:


Dri-Eaz recently purchased two companies and has been marketing them together as Legend Brands. That's keeping Dean plenty busy these days. You could say he's living the CMC100 slogan: "High Performance, Low Profile."

Thursday, September 04, 2008

Using Photoshop Levels

I described this technique to my friend Joel Cinnamon and he said I should post it on my blog. So here is my first Photoshop tutorial, such as it is:

Here's the "sitch": You have a digital image that you photographed on a very hazy day and it's so washed out, you can barely see what it was that made you point your camera in that direction. It's amazing what the camera can capture, and Photoshop can recover, using its Image-Adjustments-Levels menu.

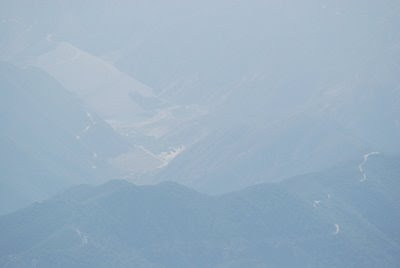
The photo below is of the Seven Oaks Dam in East Highland, Calif., taken from several miles away on the San Bernardino Peak Trail. It was so hazy, my lens couldn't find an edge sharp enough to auto-focus on. A throw-away image, right? Not quite. (Click on these images to view full size.)


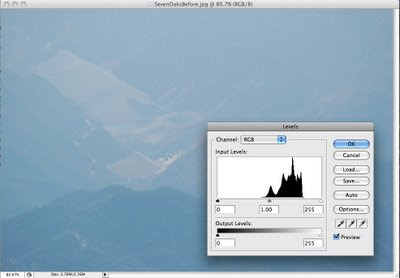
Opening the Levels dialog box displays the image's histogram (photo below), which is a graphic representation of its tonal range. In this case, both the highlight and shadow regions of the image are "blown out" -- there is no detail in those areas. Notice the big gaps between the highlight and shadow end points and where there is density in the image (represented by the graph in the center):


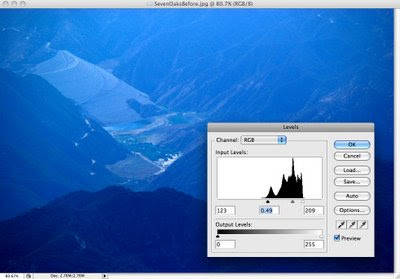
Grabbing the end points for the highlight and shadow values and dragging them to the area where the curve shows some density will eliminate much of the "noise" and reveal the detail you need:


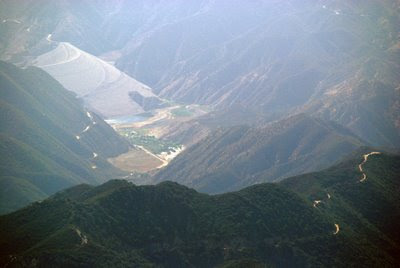
Of course, the resulting color is not true, so you will need to do additional manipulation. Because I have trouble seeing accurate color, I opted for Photoshop's Auto Color adjustment, which did the trick. While it's still not a great shot, it allows me to demonstrate to my friend Phil Richards that there is no lake behind the dam, as he contends. It looks more like a puddle.


Using Auto Color won't work in all cases, nor will the use of Levels in the manner described above. Moving the slider for the mid-tone value can help, too. If you want to explore more options, venture into manipulating Curves. The possibilities are nearly endless. There are a lot of in-depth tutorials on how to manage histograms, but this is a quick way to make a really bad shot look better.

Tuesday, September 02, 2008

San Bernardino Peak


Labor Day, Sept. 1, 2008: I rode my bike to Angeles Oaks and hiked to San Bernardino Peak. I really recommend this hike for anyone who wants to experience the San Bernardino mountains. The view is spectacular!


The valley was pretty hazy yesterday, so the photos are going to need some serious Photoshop work and will be posted later, along with video and the usual blah-blah-blah-me-me-me. Good news: My new Garmin Forerunner 305 GPS battery held out for the entire 12.5-hour trip. (Unlike my 301, which let me down on San G.) My MotionBased digest has all the data for the day, which amounted to almost 15,000' of elevation gain.

Below is a panorama I stitched together with Photoshop that merges five separate exposures. It was taken from mid-way up the mountain and includes Mount San Antonio (Old Baldy) in the distance and Big Bear (far right). Click on the image to view full size:


Update Sept. 3: Here are a few more photos from the hike. It's amazing what you can do by manipulating levels in Photoshop. Click on these images to see larger versions (which have been downsized for the web. I'll post the full-size originals in my SmugMug gallery later).

Looking west across San Bernardino valley toward Mount San Antonio (Old Baldy):


San Gorgonio Mountain from San Bernardino Peak:


Seven Oaks Dam:


Washington's Monument with Big Bear Lake in the background:


Screenshot of MotionBased Player view of hike (stopped at the end to display cumulative data):